Docker is a tool that is used to combine a software application code and its dependencies as a single package, that can run independently in any computer’s environment. Docker is a very useful DevOps tool to build and package software applications, that can be used across multiple platforms in software engineering. A developed software application may depend on a tone of dependencies and the dependencies of a software may fail to install due to differences in coding environments such as operating systems or poor environment setup. If we can isolate the software in such a way that it will be independent of the computer’s environment, the frustrations of failed dependencies to use a software will be greatly reduced. This is where docker comes in as a handy tool. The goal of docker is to organize the software code and its dependencies into a single package, that can be installed and used in an independent environment.
A real life example of my explanation above is this:
A machine learning software application is built in python for classifying objects in images and videos. The goal of the engineer is to make this software available for everyone to use. In reality, using the software will require you to install deep learning libraries like tensorflow or pytorch, additional dependencies like opencv, numpy and a tone of other packages. The engineer can easily package this software’s code and dependencies as a single package using docker. Anyone can download the machine learning software application as a dockerized application and use it without worrying about installing its dependencies.
In this article, I will explain in details the basic concepts of docker and how to build a dockerized application.
DOCKER CONCEPTS
Firstly, we need to understand some basic concepts of docker that will give an intuition into the process which makes it possible to build a software with it. Some of the most important concepts include:
- Docker Host: This is the physical or virtual machine where we install docker and run the docker engine. It can be your laptop or a virtual machine provided on a cloud computing platform like Azure, AWS .
- Docker Daemon: This is the part of docker engine that controls the building and running of dockerized applications.
- Docker Client: This is an interface that serves as a medium used to communicate with the docker daemon in the docker engine e.g, Command Line Interface. We can input commands to start or end an operation in docker daemon using Command Line Interface.
- Docker Image: This is a set of read only layers produced from the software code components during the building of a docker application. It is the package produced from packaging the software code and its dependencies. It serves as the template from which the docker container is produced.
- Docker Container: It is created when you run the image. It is the running state of the image. Docker container executes the code packaged in a docker image.
- Docker Containerization: It is the the state of running a soft application code in a docker container.
- Container Registry: This is a centralized place where docker images are stored. Docker hub is the most popular registry for docker images. Cloud computing platforms like Azure, AWS and Google cloud have their own container registries. Docker images are uploaded and downloaded from dockerhub.
DOCKER IMAGE BUILD
In this part, we shall discuss the procedures involved in packaging a software code and its dependencies as a dockerized application or docker image. I will give a simple guide on building a docker image. In every docker image building process, there is a very important file called Dockerfile that controls all the steps of docker image building.
CODES FOR DOCKER IMAGE BUILDING
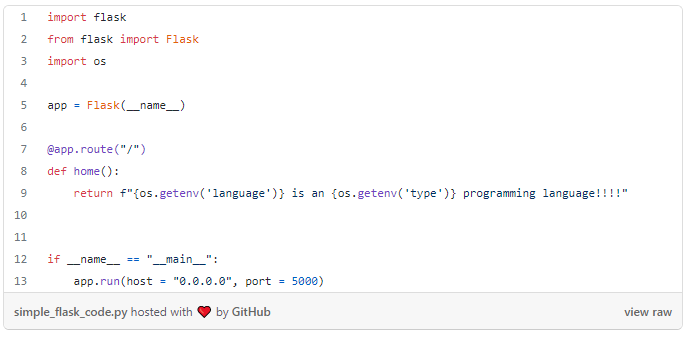
Python code
This is the python code we want to package in the docker image.

requirements.txt file
This is the file that contains the required dependencies for the image we want to build and the only requirement to be installed for our simple docker image is flask.
flask
DOCKERFILE
This is the file that contains a set of instructions or commands which tell the docker daemon how to build a docker image. It has a lot of commands that determine image build.

DOCKERFILE COMMANDS
FROM: This is the command to pull or download a docker image from a container registry. This image will serve as the base image for building a custom docker image. In this sample above, the base image used is python:3.8-slim-buster.
ENV: This is the command that is used to define environmental variables to be used in the docker container.
WORKDIR: This is the command that specifies the directory where the docker image will be built and if the directory does not exist, it is created automatically.
RUN: This is the command that is used to execute other commands such as installing the dependencies for the docker image.
COPY: This is the command that copies all the necessary code files for building the docker image into the working directory .
EXPOSE: This is the command that will allocate a port to the container that will be created from the docker image.
CMD: This is the command that executes the running process of the container created from the image. In this sample we just want to run the code in a python file app.py.
Image Build
This is the docker command to build the image.
docker build -t sampleimage .
- t: This represents the tag given to the image we want to build. The default tag is latest and it can be given a more reasonable tag like v1 to represent image build versions. The dot at the end of the build command represents the build context of the image. In this case the image is built within the current working directory.
Process of Docker Image Build
When you start building your image you will see a log like this in your CLI interface:
Sending build context to Docker daemon  2.048kB
Step 1/8 : FROM python:3.8-slim-buster
3.8-slim-buster: Pulling from library/python
b380bbd43752: Pull complete
81c44d634db0: Pull complete
9667f949f66d: Pull complete
3e9f5c1d871e: Pull complete
b181e9f84c74: Pull complete
Digest: sha256:9e3036f6b032794efb662f3c579c4c35d0b678bc793590e3e2e217cb5bf1e11b
Status: Downloaded newer image for python:3.8-slim-buster
---> 52c287c5a9a3
Step 2/8 : ENV language Python
---> 3daefef935e9Step 3/8 : ENV type Object Oriented
---> Running in 374baff80d4aRemoving intermediate container 374baff80d4a---> 5d093fcdd6baStep 4/8 : WORKDIR /app---> Running in 5925b551d682Removing intermediate container 5925b551d682---> 94fa4e3b33ddStep 5/8 : EXPOSE 5000---> Running in 3c3d1bdf6cbcRemoving intermediate container 3c3d1bdf6cbc---> 515acc697171Step 6/8 : COPY . /app---> 67f96e5cdf0bStep 7/8 : RUN pip3 install -r requirements.txt---> Running in eeee3ef25fc7Collecting flaskStep 8/8 : CMD ["python3", "app.py"]---> Running in e7df1dd83cceRemoving intermediate container e7df1dd83cce---> 7a9115cda945Successfully built 7a9115cda945Successfully tagged imagesample:latestdocker build -t imagesample .Sending build context to Docker daemon  2.048kB
Sending Build Context to Docker Daemon: When the command docker build -t imagesample . is executed, the first output shown is sending build context to Docker daemon, which handles the building of docker images. The command line interface serves as a Docker client that sends the command entered to Docker daemon to build the image.
Step 1/8 : FROM python:3.8-slim-buster3.8-slim-buster: Pulling from library/pythonb380bbd43752: Pull complete81c44d634db0: Pull complete9667f949f66d: Pull complete3e9f5c1d871e: Pull completeb181e9f84c74: Pull completeDigest: sha256:9e3036f6b032794efb662f3c579c4c35d0b678bc793590e3e2e217cb5bf1e11bStatus: Downloaded newer image for python:3.8-slim-buster---> 52c287c5a9a3
step 1/8: It is the execution of the command to pull the base image which is python:3.8-slim-buster.
Note: Docker Pull is the process of downloading an image from a container registry.
Step 2/8 : ENV language Python---> 3daefef935e9
Step 3/8 : ENV type Object Oriented---> Running in 374baff80d4a
step 2/8 and 3/8: These steps set the environmental variables for the docker image to be used in the container.
Step 4/8 : WORKDIR /app---> Running in 5925b551d682Removing intermediate container 5925b551d682---> 94fa4e3b33ddStep 5/8 : EXPOSE 5000
step 4/8 and 5/8: step 4 sets the working directory for the docker image, while step 5 exposes port 5000 for running the docker image as a container.
Step 6/8 : COPY . /app---> 67f96e5cdf0bStep 7/8 : RUN pip3 install -r requirements.txt---> Running in eeee3ef25fc7Collecting flaskStep 8/8 : CMD ["python3", "app.py"]
step 6/8, 7/8, 8/8: step6 copies all the needed files from the working directory. step8 installs the packages provided in the requirements file. step8 builds the layer for running the docker image as a container.
Successful Image Built
Successfully built 7a9115cda945Successfully tagged imagesample:latest
This is the last log output which shows that the image has been successfully built and the image is tagged as imagesample:latest.
Note: There are eight steps in this docker image building process, which corresponds to the eight instructions defined in the dockerfile. If twenty stages are defined in the dockerfile, there will be 20 steps to build the image.
Docker Image Run
We have built the image and the next step is to run it. When you run an image a container is automatically created from the image. The container will execute the code we used to build the image. Run the docker image using this command:
docker run -p 80:5000 imagesample
-p 80:5000: This is the port allocation for running the container created from running the image. We exposed port 5000 in the dockerfile and we mapped port 80 to port 5000.
The output of running docker will be:
Serving Flask app ‘app’ (lazy loading)
 * Environment: production
 WARNING: This is a development server. Do not use it in a production deployment.
 Use a production WSGI server instead.
 * Debug mode: off
 * Running on all addresses.
 WARNING: This is a development server. Do not use it in a production deployment.
* Running on http://172.17.0.2:5000/ (Press CTRL+C to quit)
Visit localhost:80 in your browser and this will be the page loaded!
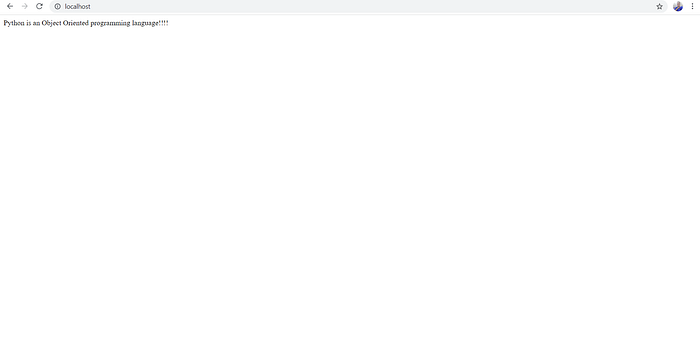
The container loaded a simple web page with the print message in the python code we used in the image build.
@app.route("/")
def home():
   return f"{os.getenv('language')} is an {os.getenv('type')}      programming language!!!!"
Note: This simple docker image is built for explaining the basic concepts behind docker image building. In the later part of this article, we shall discuss a more practical use of docker for building a Rest API.
DOCKER IMAGE UPLOAD TO CONTAINER REGISTRY
We have successfully built a docker image, but we need a docker hub account to make it available for everyone to download and use.
Once you have an account on Dockerhub, you can upload your docker image using your account.
Docker Push: It is the processing of uploading a docker image to a container registry. It follows simple procedures:
Login into your docker hub through the CLI interface,
docker login
Tag your image with your dockerhub username,
docker tag yourimage yourdockerhubusername/yourimage
Push the docker image.
docker push yourdockerhubusername/yourimage
Sample docker image pushing.
docker tag imagesample ayoolaolafenwa/imagesample
docker push ayoolaolafenwa/imagesample

BUILDING A MACHINE LEARNING REST API WITH DOCKER
One of the most important contributions of docker is using it to build Rest APIs. Rest API is simply an API that uses HTTP requests to access and use data. Rest API is one of the backbones of websites that enables us to easily use and access data online. Have you ever wondered how AI models are used in websites, how a shopping site will make product recommendations based on your previous purchases, using an AI model in the background? We are able to use AI models in the background through Rest APIs, which make it possible for the models to accept user’s data to make correct predictions. In this part of this tutorial, I will show the practical use of docker in building a Machine Learning REST API. I implemented an image segmentation API for this purpose, using my python library PixelLib for image segmentation.
API Goal: I used docker to containerize the code used for image segmentation and its dependencies as a single package to create a Rest API.
CODES FOR BUILDING DOCKER IMAGE FOR SEGMENTATION API
Dockerfile for Image Segmentation API
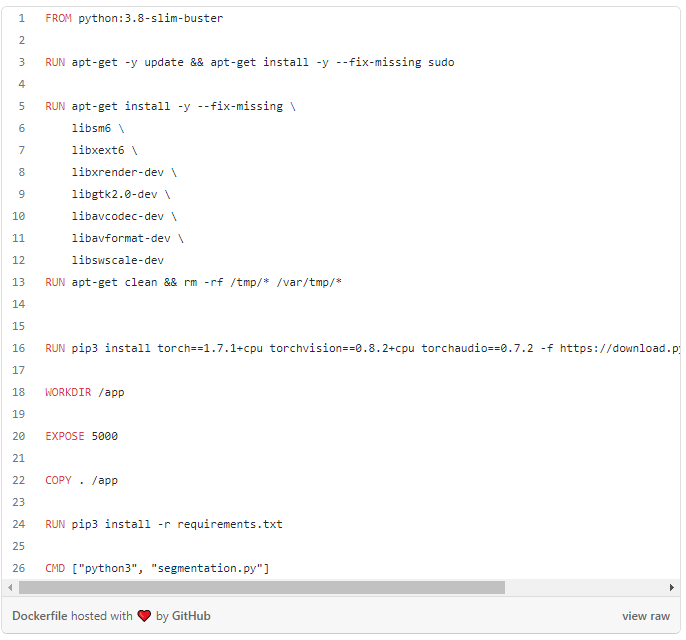
We defined a more complex dockerfile with a tone of packages to be installed for building our image. All the packages installed in this Dockerfile are required dependencies for PixelLib image segmentation API. The packages include a lot of linux packages for OpenCV and pytorch deeplearning library used for PixelLib.
requirements.txt
pixellibflaskpycocotools
The requirements.txt file included additional dependencies for our segmentation API, particularly PixelLib, the library for performing image segmentation.
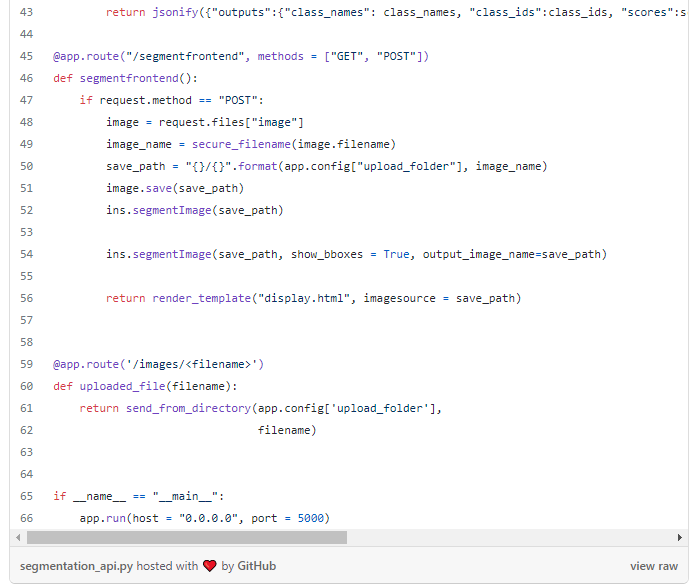
Segmentation API Code

Html Code for Web API

Note: Building this Image Segmentation API will consume a lot of time because of the number of dependencies to be installed in building the image. I have built this docker image for image segmentation API and it is available on Dockerhub, you can easily pull the image from there using:
docker pull ayoolaolafenwa/pixellibapi
If you want to build the image clone the code repository:
git clone ayoolaolafenwa/pixellibapi
Download the PointRend Pickle segmentation model and place it in the ImageSegmentationAPI directory.
cd ImageSegmentationAPI
docker build -t yourimagename
Run Segmentation API
docker run -p 80:5000 ayoolaolafenwa/pixellibapi
Note: The image sample I run in this article used my sample docker image I pushed to dockerhub. If you build your own image, replace it with your image name.
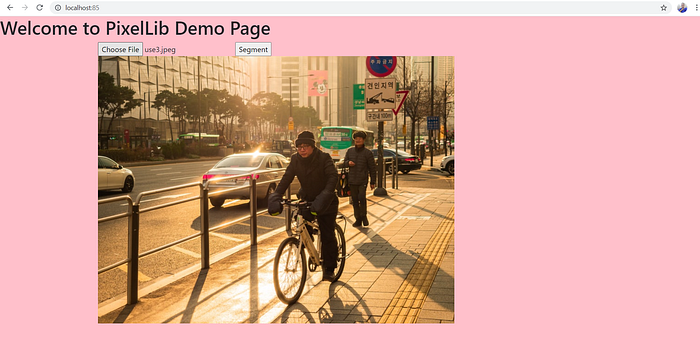
When we run the image we can use the API to detect objects in any image.
sample image for testing our API

Code to Run API

results = requests.post("http://localhost:80/segmentapi", files = {"image": open("sample.jpg", "rb")}).json()
print(results["outputs"])
We used python requests function to accept the url of the image segmentation API we are running, which is http://localhost:80/segmentapi. We passed in the path of the image and finally printed out the outputs from the segmentation API.
The outputs of this code for the sample is:
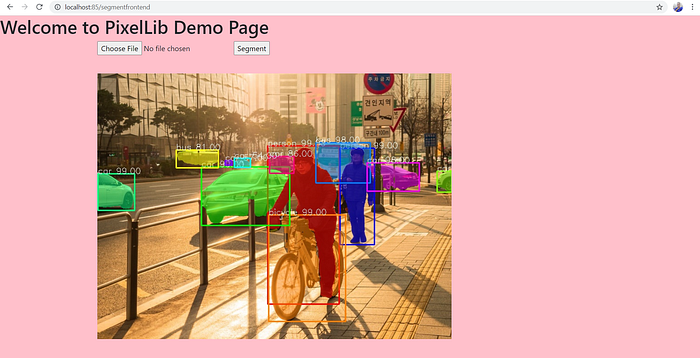
{'boxes': [[372, 158, 528, 504], [530, 163, 605, 374], [1, 219, 81, 299], [374, 309, 542, 542], [227, 204, 420, 332], [477, 151, 596, 239], [589, 195, 703, 257], [742, 213, 774, 259], [376, 181, 429, 218], [172, 167, 264, 206], [279, 190, 294, 200], [299, 185, 334, 205]], 'class_ids': [0, 0, 2, 1, 2, 5, 2, 2, 2, 5, 2, 2], 'class_names': ['person', 'person', 'car', 'bicycle', 'car', 'bus', 'car', 'car', 'car', 'bus', 'car', 'car'], 'mask_shape': [581, 774, 12], 'object_counts': {'bicycle': 1, 'bus': 2, 'car': 7, 'person': 2}, 'scores': [99, 99, 99, 99, 99, 98, 98, 97, 86, 81, 57, 54]}
The outputs include a lot of details about the objects detected in the image, which include the box coordinates values, class ids, class names, object counts, segmentation mask shape and prediction scores. We have successfully run an image segmentation API. Anyone can pull the docker image, run it as a container and perform image segmentation without any worries about what are the requirements or dependencies. This is a basic example of a machine learning backend API.
Image Segmentation Frontend API: I provided a simple web API to test on images directly and visualize the results. Visit the port you are running the API e.g localhost:80 and perform a simple web image segmentation.
You can choose any image and press the button segment, it will display an output segmented image within seconds.
Docker Commands
List Docker Images
This is the docker command to list the docker images available in your computer.
docker image ls
This docker command will list all the information about the docker images in your CLI, which include its repository name, tag, image id, size and the date created. This is a sample log below:

Check Docker Container Status
This is the docker command to check the status of a running docker container in your computer.
docker ps
It will print out the container id, image, command used to run the container, date the container is created, status of the container, container name and the running port of the container. A sample log below;

You can see the container name of a particular image when you run the command docker ps . This makes it possible to interact with the running container and this sample log above shows the default container name which is sad_goldwasser.
Note: When you run an image, the container created from it is automatically given a default name by docker. You can give it your own name, using this modified command to run the docker image.
docker run -p 80:5000 --name testimage ayoolaolafenwa/pixellibapi
In the command above, we gave the running docker container the name testimage.
The new log will be:

Note: The container name is testimage, the name that was given when we run the docker image.
Stop Docker Container
Use this command to stop a running docker container using its name.
docker stop container name
where the docker container name is testimage it will be:
docker stop testimage
or docker stop using the default name given by docker if a name is not given.
docker stop defaultname
Remove Docker Image
Use this command to remove a docker image.
docker image rm yourimagename
Visit the PixelLibAPI repository:
GitHub – ayoolaolafenwa/PixelLibAPI
This repository is a collection of codes using docker to deploy a machine learning model as a Rest API for performing…
github.com
The post Docker In Pieces appeared first on Black In Data.