
“What use is a machine learning model if you don’t deploy to production.”
– Anonymous
Are you tired of waiting for a software developer to integrate your machine learning model into a website for testing after training your model for days?
Are you bored of the usual model deployment to a website?
Are you looking for a fun way to deploy your machine learning model?
Worry no more because, with your python skills, we can take an unusual approach and deploy the machine learning model as a chatbot instead.
Chatbot has been around the corner and is becoming increasingly popular post-COVID-19. What’s more, chatbots are easy to access, easy to build, and can be integrated on almost any platform.
You can check out my previous article on how chatbots can turbocharge your business here.
Grab a seat while I walk you through this beautiful adventure.
The Flow
This project would be divided into two sections, the frontend and the backend.
* The frontend
The frontend would consist of our chatbot, which would be built with Dialogflow and integrated with Telegram
* The backend
The backend Would consist of the ML model deployed as a flask API hosted on a server.
The Dataset.
The Dataset we are going to use is the Loan prediction dataset. The loan prediction dataset is a unique dataset that contains 12 columns. The data was gathered to predict if a customer is eligible for a loan.
The Dataset is publicly available on Kaggle and can be accessed using this link.
Cleaning and creating & saving the machine learning models
Let’s Start with the bottom-up approach and build a simple Machine learning model. For this project, we would not be concerned with achieving high accuracy on our models. We only need enough accuracy so that our chatbot can make decent predictions on the fly.
Loading and Analyzing the Data
We start by importing the necessary libraries like Pandas, NumPy, Matplotlib, and seaborn. We then use pandas read_csv() to read the data.
#import neccessary libraryimport pandas as pd
import numpy as np
import matplotlib.pyplot as plt
import seaborn as sns#loading the datasetdf_train = pd.read_csv("train.csv")
df_test = pd.read_csv('test.csv')
Data preparation and cleaning
Checking the summary of the Dataset, we can see that we have a few missing data. We will take care of the missing data by filling it with the mean and mode.
Please note: that there are more advanced techniques to fill missing data; for the sake of this project, we will prioritize simplicity over accuracy.
df_train.info()<class 'pandas.core.frame.DataFrame'>
RangeIndex: 614 entries, 0 to 613
Data columns (total 13 columns):
 #   Column             Non-Null Count  Dtype
---  ------             --------------  -----
 0   Loan_ID            614 non-null    object
 1   Gender             601 non-null    object
 2   Married            611 non-null    object
 3   Dependents         599 non-null    object
 4   Education          614 non-null    object
 5   Self_Employed      582 non-null    object
 6   ApplicantIncome    614 non-null    int64
 7   CoapplicantIncome  614 non-null    float64
 8   LoanAmount         592 non-null    float64
 9   Loan_Amount_Term   600 non-null    float64
 10  Credit_History     564 non-null    float64
 11  Property_Area      614 non-null    object
 12  Loan_Status        614 non-null    object
dtypes: float64(4), int64(1), object(8)
memory usage: 62.5+ KB
Filling missing Data
#Imputing Missing values with mean for continuous variable
df_train['LoanAmount'].fillna(df_train['LoanAmount'].mean(), inplace=True)#Imputing Missing values with mode for categorical variables
df_train['Gender'].fillna(df_train['Gender'].mode()[0], inplace=True)
df_train['Married'].fillna(df_train['Married'].mode()[0], inplace=True)
df_train['Dependents'].fillna(df_train['Dependents'].mode()[0], inplace=True)
df_train['Loan_Amount_Term'].fillna(df_train['Loan_Amount_Term'].mode()[0], inplace=True)
df_train['Credit_History'].fillna(df_train['Credit_History'].mode()[0], inplace=True)
df_train['Self_Employed'].fillna(df_train['Self_Employed'].mode()[0], inplace=True)
Feature engineering
Converting categorical variables into dummy/indicator variables.
cat_cols = ['Gender','Married','Education','Self_Employed','Property_Area']train_df = pd.get_dummies(df_train,columns=cat_cols,drop_first=True)
Training the Model
#split the data into train and test for trainingfrom sklearn.model_selection import train_test_splitX = train_df.drop(columns='Loan_Status')
y = train_df['Loan_Status']X_train,X_test,y_train,y_test = train_test_split(X,y,test_size=0.3,random_state=42)#import the randomForest algorithm to train the datasetsfrom sklearn.ensemble import RandomForestClassifier
from sklearn.feature_selection import SelectFromModel
from sklearn.metrics import accuracy_scoresel = SelectFromModel(RandomForestClassifier(n_estimators=100,random_state=0,n_jobs=-1))
sel.fit(X_train,y_train)
sel.get_support()X_train_rfc = sel.transform(X_train)
X_test_rfc =sel.transform(X_test)#Using Recursive Feature Elimininationdef run_randomForest(X_train,X_test,y_train,y_test):
    rfc = RandomForestClassifier(n_estimators=100,random_state=0,n_jobs=-1)
    rfc.fit(X_train,y_train)
    y_pred = rfc.predict(X_test)
    print("Accuracy: ", accuracy_score(y_test,y_pred))
    print('n')
    print("Confusion Matrix")
    print('n')
    print(confusion_matrix(y_test,y_pred))#Save our model as pickle so it can be reused to make predictions
import pickle
with open(r'rfc.pkl','wb') as model_pkl:
    pickle.dump(rfc, model_pkl, protocol=2)
After preparing the Dataset, I used recursive feature elimination to select features with the highest predicting factor. I found that using four features, we got an accuracy of 76%, while 11 features got an accuracy of 78%.
You can find the whole notebook containing the code on GitHub using this link.
Building the Frontend
The front end would consist of the Dialogflow bot and telegram integration.
What is Dialogflow?

Dialogflow is a natural language understanding platform designed by Google that makes it easy to design and build enterprise-grade chatbots.
Dialogflow makes creating chatbots easy, and It uses NLU Natural language understanding on pre-trained models to understand Users’ intent with little training data. One of the reasons I choose Dialogflow is its robustness and its easy Integration with another third-party app.
Trending Bot Articles:
1. How Conversational AI can Automate Customer Service
2. Automated vs Live Chats: What will the Future of Customer Service Look Like?
3. Chatbots As Medical Assistants In COVID-19 Pandemic
4. Chatbot Vs. Intelligent Virtual Assistant — What’s the difference & Why Care?
Creating the chatbots using Dialogflow
We will follow the steps below in creating our chatbot
- Create the chatbot
- Create intents
- Fulfilment
- Integration
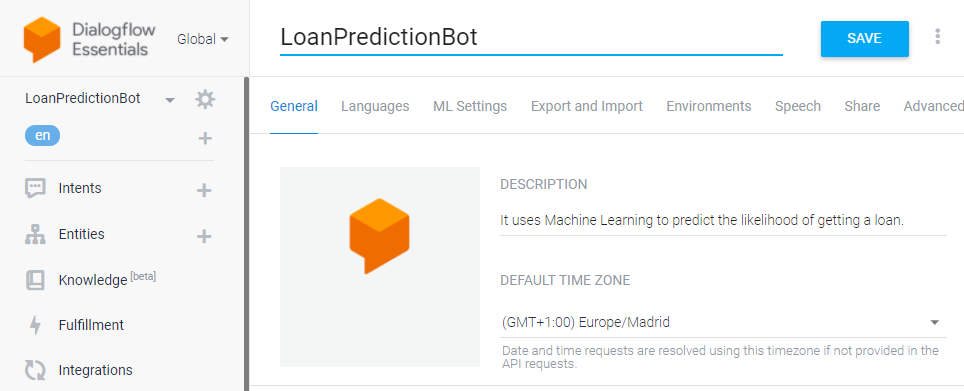
Create the chatbot
To create our chatbot, kindly go to https://dialogflow.cloud.google.com/ to create an account. After completing the account, click on create an agent to create the chatbot, as shown in the image below.
Create Intents
When creating a chatbot, Dialogflow presents you with two default intents; welcome intent and fallback intent.
Intents are the actions users want to execute. Intents represent something a user might ask for. Intents help the chatbot agent determine what the users want. e.g. One Pizza, please (Intent: Order Pizza).
Welcome Intent
The welcome intent is triggered when a user interacts with the bot; it is usually a greeting, as its name suggests. e.g. Hello, I’m the loanPredictionBot. Would you like to make a prediction?
Click on the plus sign on the intent tab to Modify the welcome intent and add the response below.
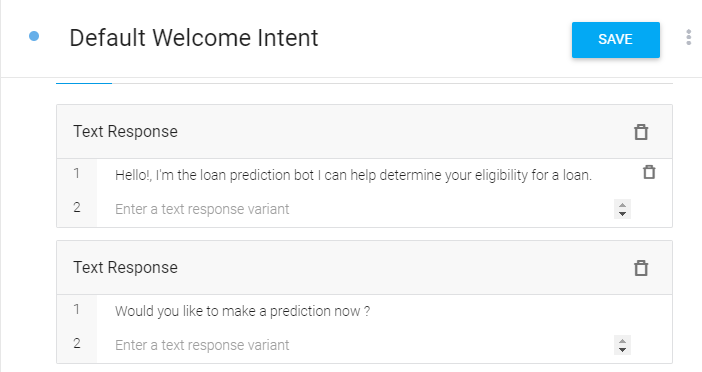
After adding the response, kindly click save and allow the chatbot to train.
After it has finished training, click on the default intent and create a follow-up intent.
Follow-up Intent
Follow-up intents are used to guide the user into making a prediction.

After the welcome intent is triggered, the user would be asked to make a Prediction; if the user clicks yes, the yes-follow up intent is triggered, and the user is asked for parameters to make the prediction. If the user selects no, the No-follow up intent is triggered.
Follow-up intent
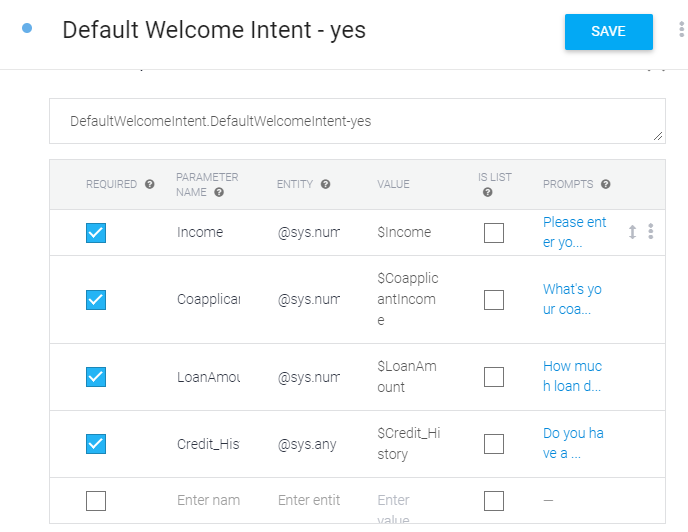
The yes follow-up intent is where the real magic happens. This is where the user inputs details to be used for making predictions.
Kindly add the parameters(features) that we selected using recursive feature elimination. These are the features that the user would be prompted for when he tries to make a prediction.
Dialogflow uses entities to extract information from the intent. Use the default sys.number entity so that the chatbot would only accept numbers. Don’t forget to click the save button after adding the parameters.
Using the same technique, let’s create the No follow up intent.
The No follow-up intent would be triggered when the user clicks on No.

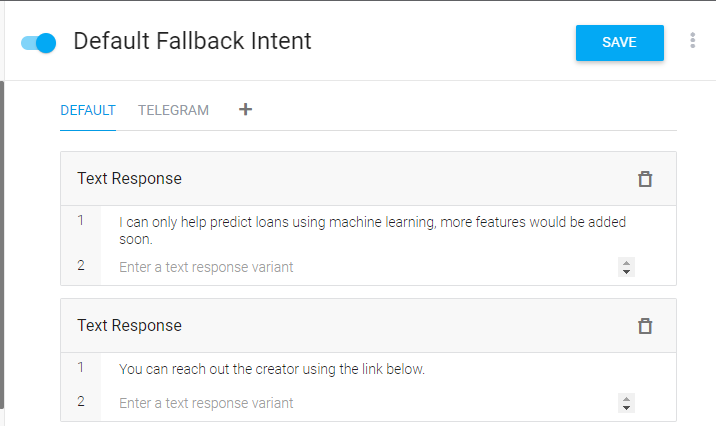
The fallback intents would be triggered when the Dialogflow agent cannot understand the user’s input. It would be populated to return a response to guide users on how to use the bot.
For now, the fallback intent would be configured as described below.
Fulfillments
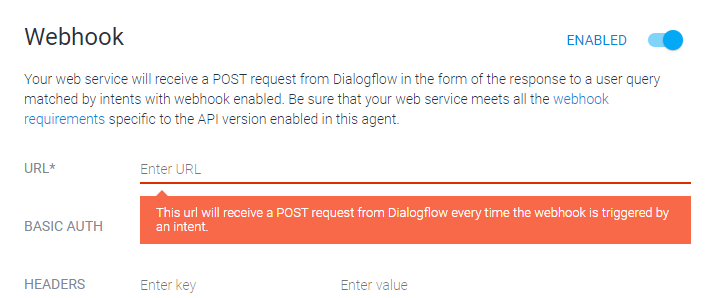
Fulfilment is a feature in Dialogflow that allows the agent to communicate with external applications using a webhook. With fulfilment, you can connect the chatbot to a database, map API or backend service.
To use fulfilment, we must turn it on in the Dialogflow console, go to the fulfilment tab and turn on webhook. Leave the URL field empty for now.
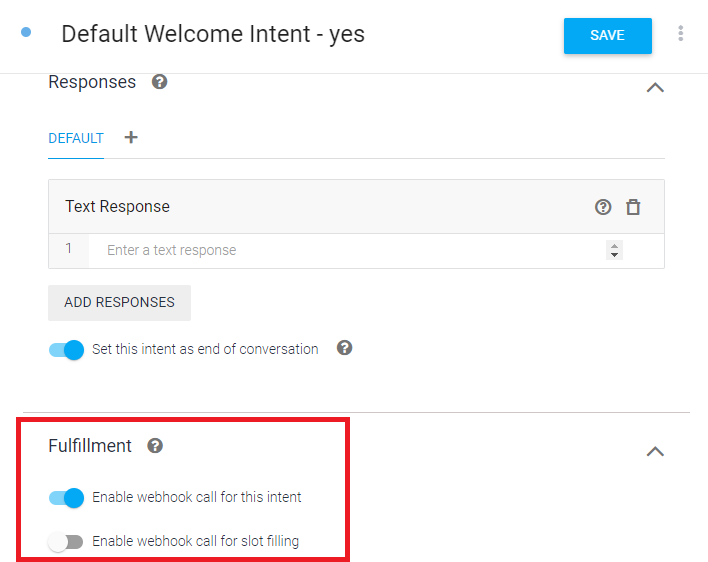
Goto the default yes follow-up intent and turn on fulfilments. This will allow the yes follow-up intent to send input received from users to the backend flask service.
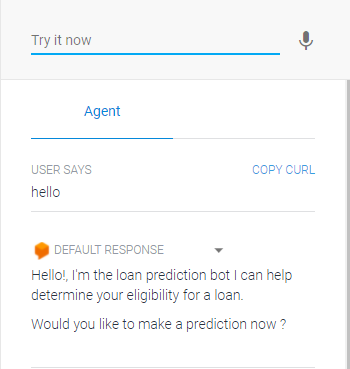
Testing the Agent
Using the Dialogflow console, test the chatbot by typing “hello”. This would trigger the Welcome intent.
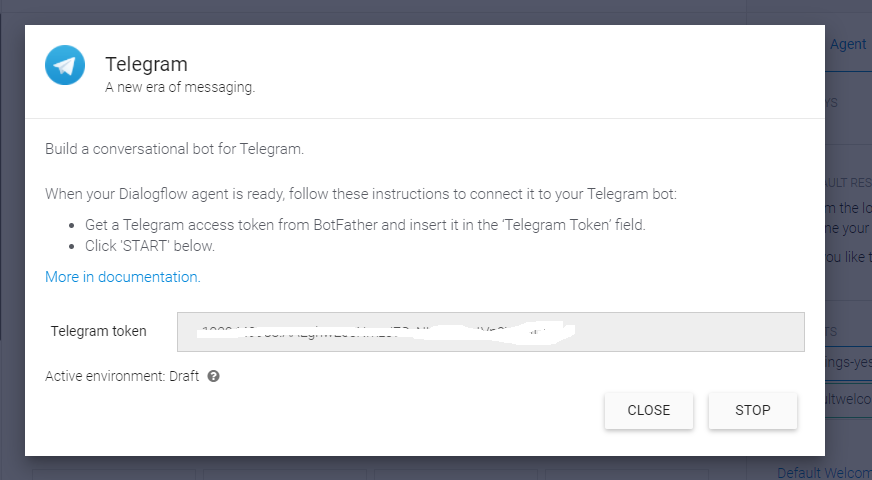
Telegram Integration
To Integrate with Telegram, We need to create a Telegram bot.
Kindly go to Telegram and search for botFather. Using the on-screen guide, create a bot and copy the access token. We will use the access token to link Dialogflow with the telegram bot.
Kindly go to Dialogflow and click on the Integration>> Telegram.
Paste the access token as shown in the image below and click start.
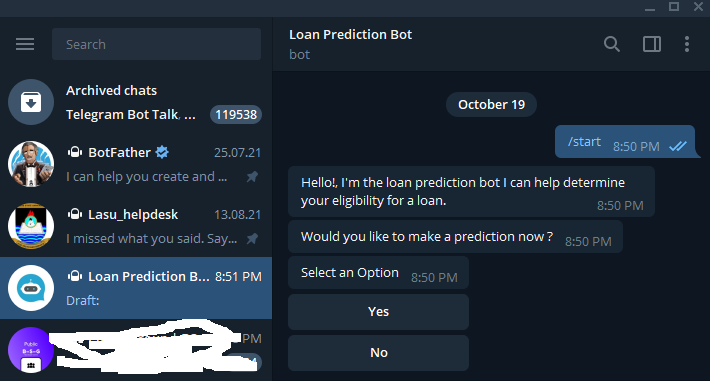
Go back to the Telegram bot and interact. You should get the same response.
Conclusion
We have come to the end of the first part of creating a Machine learning model as a chatbot. In part two of this series (link here), we will deploy the machine learning model as a Flask API and link it with our chatbot.
The post Deploying a Machine learning model as a Chatbot (Part 1) appeared first on Black In Data.